Posts in Guide
eLearning Educator Dashboard Update: Enhanced Features to Customize Your Experience!

We're pleased to announce a series of enhancements to the Educator Dashboard, tailored specifically to elevate your teaching experience within OTu. Valuable faculty feedback has driven us to introduce features that simplify course management, saving you time and effort.

1. Create Custom Section Headings for Streamlined Course Organization

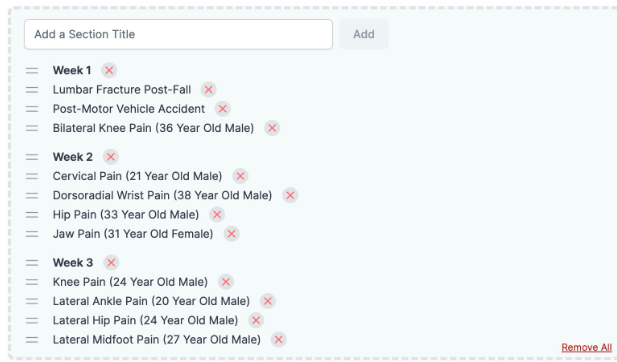
We understand the importance of clear organization in your courses. Now, with the latest enhancement, you have the ability to add section headings within the course assignment list. When creating a new course or editing an existing one, easily insert section headings to categorize and structure your content. This feature ensures a more intuitive and organized learning experience for both you and your students.

Image of student course assignment page

2. Use the "Add All" Button for Group Learning Activities

Say goodbye to individually adding multiple activities under a group. The new "Add All" button allows you to quickly incorporate all activities within a group with a single click. This gives you more time for instructional design and engagement and simplifies the step of selecting learning activities.

Image of "Add All" button

3. Click the "Remove All" Button for Effortless Cleanup

The final added helpful feature is the "Remove All" button. Tired of deleting activities one by one? Now, with a single click, you can effortlessly clear your course of all existing activities. This time-saving feature streamlines your course preparation process, allowing you to focus on delivering top-notch education to your students.

Image of "Remove All" button at the bottom right corner

At OTu, we are committed to providing you with tools that enhance your teaching experience and contribute to improved student outcomes. These Educator Dashboard enhancements have been crafted with your needs in mind, offering a more intuitive, streamlined, and time-efficient approach to course management. We can't wait for you to explore these new features!

If you have any questions or need further assistance, please don't hesitate to reach out to our support team. We're always ready to assist!

Enhancing Access to Educator Resources: Navigating the New and Improved In-App Main Page

As our team aims to make your teaching experience more seamless and efficient, we are excited to share some exciting changes happening within our web suite. Our new and improved in-app main pages are designed to make it easier for you to access valuable educator resources that were once dispersed across the website. The following provides a quick guide through the key changes and how they will benefit you in your teaching endeavors.

1. Lab Handouts and Worksheets: Streamlined Access

One of the most significant enhancements we've made is the relocation of Lab Handouts and Worksheets. These resources are now easily accessible for each app, right from the main menu under "Teaching Content." This improvement will save you precious time and simplify your workflow. No more hunting through the website; the resources you need are just a click away. Whether you're preparing for a lecture or guiding your students through a lab exercise, finding these materials is now a breeze.

2. Curricular Standards: At Your Fingertips

We understand the importance of having access to accreditation standards while planning your courses. To facilitate this, we've made standards and textbook references available for each app and simulation. These provide a valuable reference tool, helping you align your teaching objectives with your institution's educational goals, professional accreditation standards, and contemporary textbook references. You can easily locate these within the respective app or simulation, saving you the hassle of extensive searching.

3. App Tutorial Videos: Seamless Integration

Visual aids are invaluable when it comes to understanding and using educational technology effectively. That's why we've restructured our web suite to house App Tutorial Videos under "App Information." Now, when available, you'll be able to quickly familiarize yourself with the ins and outs of the application, making it easier to integrate into your teaching materials.

As we strive to enhance your teaching experience, the relocation of educator resources to the in-app main page is a significant step forward. We understand the challenges you face as educators, and these changes are designed to simplify your access to essential materials, streamline your planning, and, ultimately, improve the learning experience for your students. We hope these modifications make your educational journey smoother and more efficient. 


Should you have any questions or need additional assistance, please schedule a meeting today with your OTu Education Expert, Dr. Yvonne Randall.

Your success as an educator is our priority, and we're committed to providing the resources and support you need to thrive in your teaching role!

eLearning Educator Dashboard Part 2: Guide to Creating and Managing Course Assignments

Are you ready to create and manage course assignments for your students using our Educator Dashboard? In this step-by-step guide, we'll walk you through the process from start to finish. Let's get started!

Step 1: Add Students to the Cohort

Before you begin creating course assignments, ensure you've successfully added students to the cohort. This will help you manage and track their progress effectively.

Step 2: Create a New Course

To create new course assignments, start by providing a course title that matches the course you're teaching and set the start and end dates based on the duration of the course. The scores collected in the gradebook will be based on the learner's activity during the specified date range.

Step 3: Choose Course Assignments

Now, let's select the assignments your learners should complete throughout the course. You can see all available apps or filter them by category. Select the app you’re looking for, for example, "Assistive Devices Simulations" and choose the learning modules within that app.

Step 4: Organize Assignments

Once you've selected your assignments, they will appear in your assignment list. You can also adjust their order by dragging them up or down. If you make a mistake, no worries - you can easily delete any assignment by clicking the 'X' button. You can then assign course assignments to your students through your syllabus or learning management system.

Step 5: Access the Gradebook and Review Individual Scores

Students' scores will automatically populate the course's gradebook as they complete assignments. In the gradebook, you'll see the course, cohort, and list of the organized assignments.

Within the gradebook, you can review individual student scores for each assignment. Explore details such as:

  • total time spent

  • play count

  • low and high scores, and whether the student passed the assignment (with the passing point set at 80%)

For a deeper dive into student performance, click on View for the data on each individual attempt. This detailed information will help you track and support student progress effectively.

Step 6: Roster View

You also have the option to view student progress learning activities by course roster, providing a view of all students in your class. Click on each student to see their assigned learning activities and scores.

Congratulations!

You've now learned how to create and manage course assignments using our Educator Dashboard. This powerful tool will help you track, support, and enhance your students' learning experiences.

If you have any questions or need further assistance, please don't hesitate to reach out to our support team. We're always ready to assist!

eLearning Educator Dashboard Part 1: Link Faculty and Student Accounts in Three Simple Steps!

We are thrilled to present the dynamic and user-centric Educator Dashboard, a groundbreaking tool to enhance your teaching experience.

The Educator Dashboard

  • streamlines student assignments,

  • tracks their progress,

  • and provides data-driven insights for assessment.

Let's take a closer look at how you can make the most of this innovative platform in three simple steps.

Step 1: Access the Educator Dashboard

The first step is straightforward. Log in to your faculty account and navigate to the Educator Dashboard. You'll find it conveniently located at the top of the web suite. Once you're in, a world of possibilities opens up.

Step 2: Create a Cohort

Creating a cohort is a breeze with the Educator Dashboard. Just click on "Add a Cohort." You'll be prompted to give your cohort a title and include any additional notes or instructions you think are necessary. Click "Create," and your new cohort is ready to roll.

Step 3: Invite Learners to the Cohort

The real power of the Educator Dashboard comes into play when you start inviting your learners. To do this, click on "Add Learner Emails." 

Here, you have two options:

1. CSV Spreadsheet: You can upload a CSV spreadsheet file containing the email addresses of your learners. This is a handy way to add multiple learners at once.

2. Manual Entry: Alternatively, you can manually enter learner email addresses. If you have a small group or want to add learners one by one, this is a convenient method.

After you've added your learners to the cohort, the next step is to invite them to join through an email invitation from you. Here's how they can join:

Generic Invitation: You can send the pre-written invitation message that comes with the Educator Dashboard. It's quick and hassle-free.

Custom Invitation: For a personal touch, you can copy and paste the invitation link and send it via direct email, or LMS messaging, include it in your syllabus, or choose the communication method that suits you best.

Once your learners receive the invitation, they simply click the link and follow the instructions to join the cohort. It's a smooth and seamless process, designed to make your teaching experience and your students' learning journey as efficient as possible.


We hope these three steps help you get started with the Educator Dashboard and that you see the immense potential it holds for enhancing your teaching. Should you have any questions or need further guidance, our support team is always ready to assist.

Ignite the power of the new Educator Dashboard and take your teaching to the next level.


Faculty Webinar: A Guided Tour of the New Educator Dashboard

Join our team on Friday, Oct. 20 at 9 am PT/12 pm ET for a guided tour. Learn how to create and manage student cohorts, assign activities, track progress, and gather assessment data. Register today to secure your spot!

How to add videos to your lectures and handouts

While you are logged in and scrolling away at different techniques, conditions, or interventions, simply click the Educator Tools icon 🎓 (located at the top right corner of the page) and choose from three options.

You can easily COPY any of the content below and PASTE it to your presentation and handouts!

ADD VIDEOS IN 4 easy steps:

  1. Choose an app that matches your class or topic

  2. Find the procedure you want to link to your lab or lecture

  3. Open the Educator Tools from the Educator Tools icon 🎓 at the top right of the page and select an option:

    • Copy Page Title with Link

    • Copy Thumbnail Image

    • Copy Page URL

4. Paste Page Title with Link and Thumbnail Image into your lectures and labs or link the Page URL to already existing text

Check out the video below for a step-by-step demonstration:

Still need help? Schedule a call with our expert team to learn more!

Faculty, GuideMichael Wong
Sharing Options in OTu

OTu has become even more social!

While you are logged in and scrolling away at different techniques, conditions, or exercises, you will see that there is an arrow on the right side of your screen that allows the side bar to appear.

Once the sidebar appears, you will be able to see the tab Share Page with 2 options. If you would like to quickly send the link via text message or email, it is best to select Copy This Page URL to Share.

Simply, click Copy This Page URL to Share to a new text message or email so that others can also enjoy what PhysioU has to offer.

GuideKamren Ackerman
Bookmark your favorite techniques to create a study guide to succeed

Did you notice this little icon added on to your OTu webapp recently? You can locate it on the upper right corner of your webapp.

START HERE: ADD BOOKMARK

Now once you have discovered a technique, an exercise, a condition, or a case study you would like to bookmark, click the bottom right arrow to allow the sidebar to appear. Then click Add Bookmark.

Add the bookmark to your Main list or a specific custom group you plan to create or have created. Below we have created a group, “Shoulder Pain with Mobility Deficits” to provide an example for you to see.

BOOKMARK IS AVAILABLE IN THESE APPS CURRENTLY

Below are the apps in your account that may use the bookmark feature. We are working hard to make this feature available in the rest of the apps soon.

  1. Orthopaedics

  2. Exercise Patterns

  3. Evidence-based Taping

  4. Pharmacology

  5. Acute Care Simulations

  6. Neuro Simulations

  7. Ortho Simulations

  8. Physical Agents Simulations

  9. ROM/MMT Simulations

HOW TO FIND MY SAVED BOOKMARKS & GROUPS

CREATE CUSTOM GROUP

If you are wondering how we made a custom group name, look below! Very easy to do so that 5000+ videos can be seamlessly found! The section headings take your organization skills one step further!

1) Click “Create” to start a group

2) Enter a name to group your bookmarks in one place

3) Add a section heading to organize your bookmarks into different groups

4) Now your bookmarks are organized! It’s that simple!

GuideKamren Ackerman
HOW-TO add web app on your mobile devices?

The great thing about our web app version is that not only you can use it on your laptop, but it also works wonderfully on any mobile device. Follow these easy steps to add the OTu web app to your home screen on any smartphone and tablet.

STEP 1: Open up a mobile browser and type in app.clinicalpattern.com/otu/signin/

STEP 2: Enter your registered email and password. Make sure to check the box next to 'Remember me.' This way you won't need to log in again on your next visit.’

STEP 3: Then follow the Model-specific instructions:

  • If you have an Android device, please follow this link for detailed instructions. Android devices

  • If you have an iPhone/iPad, please follow this link for detailed instructions. iPhone / iPad

That’s it!

GuideMichael Wong